In this post, I’ll outline the key differences, added concepts, and elements that were left out when moving from SV/UVM to pyUVM. If you’re familiar with traditional UVM and considering using Python-based methodologies, this guide will help you understand the transition.
Key Differences Between SV/UVM and pyUVM
From what I read (References below), there are some differences between SV/UVM and pyUVM. Some may change in the future. this is a list of some of them as of pyUVM 3.0.0.
| Component | SV/UVM | pyUVM | Key Differences |
|---|---|---|---|
| Base Structure | Uses macros like uvm_component_utils and uvm_object_utils | No macros, uses Python inheritance | No registration macros needed; cleaner syntax; Python’s built-in features replace UVM macros |
| Object Utils Macros | uvm_object_utils registers the class with the factory and enables methods like copy, compare, and print through field macros | No macros – relies on Python’s native capabilities | Classes are automatically registered with the factory: methods like __eq__ and __str__ replace the need for field registration macros |
| Randomization | Uses SystemVerilog constraints | Uses Python’s random module | Direct methods like randomize_operands() instead of constraint solvers |
| Drivers | Parameterized classes with virtual interfaces | Non-parameterized classes with BFM pattern | Simpler BFM instantiation instead of interface configuration; async/await replaces tasks |
| Monitors | Complex interface configuration | Dynamic method resolution | Uses getattr() for flexible method access; Python’s logging system replaces UVM reporting |
| Coverage | Uses SystemVerilog covergroups | Uses Python data structures like sets | No dedicated covergroup construct; simpler implementation with Python collections |
| Scoreboard | Template-based FIFO connections | Direct FIFO connections | Exception handling for configuration, f-strings for reporting, simpler syntax overall |
| Environment | Factory-based component creation | Mix of factory and direct instantiation | Simpler component connection; ConfigDB() replaces template-based config_db |
| BFM Interface | Virtual interfaces passed via config_db | Singleton metaclass pattern | Python metaclass implements singleton for shared BFM access |
Understanding pyUVM Components
To fully grasp pyUVM, let’s break down its core components with code snippets and explanations.
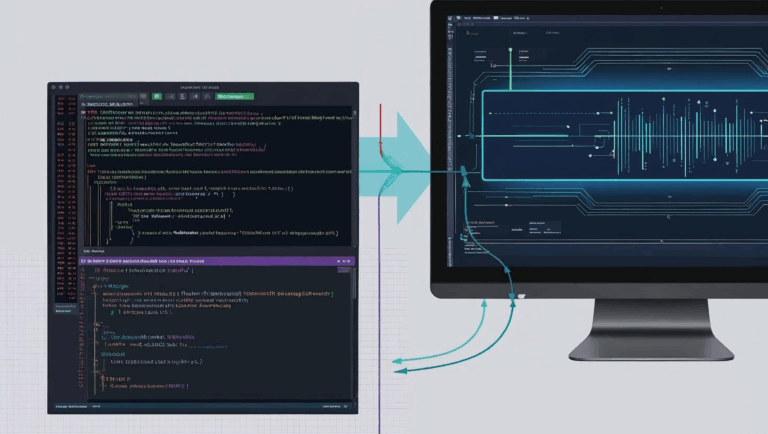
I’ll need you to open the testbench in a new window as there is too much code to include here without causing your scrolling finger to cramp 😉
1. Transactions
In SV/UVM, transactions are defined using uvm_sequence_item. In pyUVM, transactions are simple Python objects:
class AluSeqItem(uvm_sequence_item):

    def __init__(self, name, aa, bb, op):
        super().__init__(name)
        self.A = aa
        self.B = bb
        self.op = Ops(op)

    def randomize_operands(self):
        self.A = random.randint(0, 255)
        self.B = random.randint(0, 255)

    def randomize(self):
        self.randomize_operands()
        self.op = random.choice(list(Ops))

    def __eq__(self, other):
        same = self.A == other.A and self.B == other.B and self.op == other.op
        return same

    def __str__(self):
        return f"{self.get_name()} : A: 0x{self.A:02x} \
        OP: {self.op.name} ({self.op.value}) B: 0x{self.B:02x}"
This class defines an ALU transaction with operands and an operation type.
Differences:
- No
uvm_object_utilsor field registration macros needed in pyUVM so:- Python’s
__str__method replaces the need for print methods. __eq__method replaces the need for compare methods.- Randomization is implemented with Python’s
randommodule instead of SystemVerilog’s constraint solver
- Python’s
2. Sequences
Sequences generate transactions in a structured manner. Unlike SV/UVM, pyUVM sequences are Python generators:
class RandomSeq(uvm_sequence):
    async def body(self):
        for op in list(Ops):
            cmd_tr = AluSeqItem("cmd_tr", None, None, op)
            await self.start_item(cmd_tr)
            cmd_tr.randomize_operands()
            await self.finish_item(cmd_tr)
Key Differences:
- No parameterized classes in Python – simpler inheritance model
- Python uses
async/awaitsyntax instead of SystemVerilog’stask/begin/end - No factory creation using
type_id::create– direct constructor calls instead
3. Drivers
Drivers take transactions and drive signals into the DUT.
class Driver(uvm_driver):
    def build_phase(self):
        self.ap = uvm_analysis_port("ap", self)

    def start_of_simulation_phase(self):
        self.bfm = TinyAluBfm()

    async def launch_tb(self):
        await self.bfm.reset()
        self.bfm.start_bfm()

    async def run_phase(self):
        await self.launch_tb()
        while True:
            cmd = await self.seq_item_port.get_next_item()
            await self.bfm.send_op(cmd.A, cmd.B, cmd.op)
            result = await self.bfm.get_result()
            self.ap.write(result)
            cmd.result = result
            self.seq_item_port.item_done()
Key Differences:
- No virtual interface handling – BFM pattern used instead
- No need for interface configuration in pyUVM (getting vif using config.get() ) – simpler BFM instantiation
This is the first time we see any BFM or (virtual) interface, which brings us to:
IMPORTANT: TinyAluBfm and Singleton Pattern
One important element in the pyUVM implementation is the TinyAluBfm class used in the testbench:
class TinyAluBfm(metaclass=utility_classes.Singleton):
    # Implementation details...
The metaclass=utility_classes.Singleton parameter is a Python-specific feature that implements the Singleton design pattern. This is important because:
- What it does: The
Singletonpattern ensures that only one instance of the BFM class exists throughout the entire verification environment. This is crucial for maintaining a single point of connection to the HDL model. - SystemVerilog equivalent: In SystemVerilog UVM, this would typically be achieved through virtual interfaces registered in the config_db, which are then retrieved by components. Python doesn’t have virtual interfaces, so the Singleton pattern provides an alternative.
- Implementation: The Singleton metaclass modifies the class’s
__new__method to always return the same instance when the class is instantiated. This means every component that creates aTinyAluBfmobject actually gets the same shared object. - Benefits in pyUVM: Components don’t need to worry about retrieving interfaces from a configuration database – they can simply instantiate the BFM class and get the shared instance automatically.
This is a great example of how pyUVM leverages Python’s features (in this case, metaclasses) to replace SystemVerilog UVM mechanisms (virtual interfaces and config_db) with more Pythonic alternatives.

4. Monitors
class Monitor(uvm_component):
    def __init__(self, name, parent, method_name):
        super().__init__(name, parent)
        self.method_name = method_name

    def build_phase(self):
        self.ap = uvm_analysis_port("ap", self)
        self.bfm = TinyAluBfm()
        self.get_method = getattr(self.bfm, self.method_name)

    async def run_phase(self):
        while True:
            datum = await self.get_method()
            self.logger.debug(f"MONITORED {datum}")
            self.ap.write(datum)
Key Differences:
- Python uses dynamic method resolution via
getattr()– more flexible - Python’s logging system replaces UVM’s reporting mechanism
- Simpler constructor in pyUVM with direct parameter passing
5. Coverage Collection
class Coverage(uvm_subscriber):

    def end_of_elaboration_phase(self):
        self.cvg = set()

    def write(self, cmd):
        (_, _, op) = cmd
        self.cvg.add(op)

    def report_phase(self):
        try:
            disable_errors = ConfigDB().get(
                self, "", "DISABLE_COVERAGE_ERRORS")
        except UVMConfigItemNotFound:
            disable_errors = False
        if not disable_errors:
            if len(set(Ops) - self.cvg) > 0:
                self.logger.error(
                    f"Functional coverage error. Missed: {set(Ops)-self.cvg}")
                assert False
            else:
                self.logger.info("Covered all operations")
                assert True
Key Differences:
- Python’s
assertstatements used for test control instead of UVM’s reporting mechanism - No dedicated covergroup construct in Python – uses sets or other data structures
- Python uses
ConfigDB()instead of UVM’sconfig_dbtemplate mechanism, noresource_dbconstruct. - Python’s exception handling used for configuration lookup
6. Scoreboards
Scoreboards verify that DUT outputs match expected values.
class Scoreboard(uvm_component):

    def build_phase(self):
        self.cmd_fifo = uvm_tlm_analysis_fifo("cmd_fifo", self)
        self.result_fifo = uvm_tlm_analysis_fifo("result_fifo", self)
        self.cmd_get_port = uvm_get_port("cmd_get_port", self)
        self.result_get_port = uvm_get_port("result_get_port", self)
        self.cmd_export = self.cmd_fifo.analysis_export
        self.result_export = self.result_fifo.analysis_export

    def connect_phase(self):
        self.cmd_get_port.connect(self.cmd_fifo.get_export)
        self.result_get_port.connect(self.result_fifo.get_export)

    def check_phase(self):
        passed = True
        try:
            self.errors = ConfigDB().get(self, "", "CREATE_ERRORS")
        except UVMConfigItemNotFound:
            self.errors = False
        while self.result_get_port.can_get():
            _, actual_result = self.result_get_port.try_get()
            cmd_success, cmd = self.cmd_get_port.try_get()
            if not cmd_success:
                self.logger.critical(f"result {actual_result} had no command")
            else:
                (A, B, op_numb) = cmd
                op = Ops(op_numb)
                predicted_result = alu_prediction(A, B, op, self.errors)
                if predicted_result == actual_result:
                    self.logger.info(f"PASSED: 0x{A:02x} {op.name} 0x{B:02x} ="
                                     f" 0x{actual_result:04x}")
                else:
                    self.logger.error(f"FAILED: 0x{A:02x} {op.name} 0x{B:02x} "
                                      f"= 0x{actual_result:04x} "
                                      f"expected 0x{predicted_result:04x}")
                    passed = False
        assert passed
Key Differences:
- Python’s f-strings replace SystemVerilog’s $sformatf
- Python’s logger replaces UVM’s reporting mechanism
7. Environment
class AluEnv(uvm_env):

    def build_phase(self):
        self.seqr = uvm_sequencer("seqr", self)
        ConfigDB().set(None, "*", "SEQR", self.seqr)
        self.driver = Driver.create("driver", self)
        self.cmd_mon = Monitor("cmd_mon", self, "get_cmd")
        self.coverage = Coverage("coverage", self)
        self.scoreboard = Scoreboard("scoreboard", self)

    def connect_phase(self):
        self.driver.seq_item_port.connect(self.seqr.seq_item_export)
        self.cmd_mon.ap.connect(self.scoreboard.cmd_export)
        self.cmd_mon.ap.connect(self.coverage.analysis_export)
        self.driver.ap.connect(self.scoreboard.result_export)
Key Differences:
- No need for parameterized sequencers – the sequencer is generic
- Factory usage is a mix of direct instantiation and factory creation
- Notice how we use
Driver.create("driver", self)but direct instantiation for the Monitor withMonitor("cmd_mon", self, "get_cmd"), this way we can easily override-by-type the driver.
- Notice how we use
Running the TinyALU Example – a teaser for the next part…
After implementing pyUVM with the TinyALU example, the test results (as seen in the screenshot) showed how pyUVM efficiently handles verification tasks, including randomized ALU operations, parallel execution, and Fibonacci sequence testing.
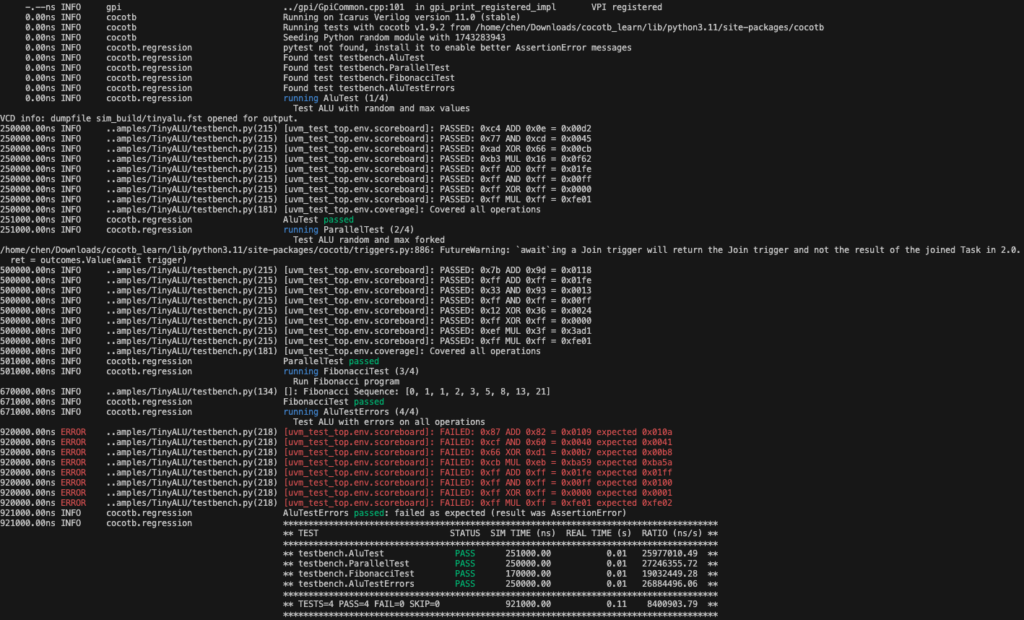
Here’s a summary of the test results:
- ALUTest: Passed with randomized values.
- ParallelTest: Passed with concurrent transactions.
- FibonacciTest: Passed, verifying arithmetic correctness.
- ALUTestErrors: Deliberately injected errors were correctly flagged.
The final test summary indicates the expected failures due to injected errors, validating the scoreboard and checking mechanisms.
Conclusion
Transitioning from SV/UVM to pyUVM offers a simpler, more flexible verification flow, particularly for those already familiar with Python. While it lacks some of the rigid structure of traditional UVM, it makes up for it with ease of use, coroutine-based execution, and integration with cocotb.
If you’re looking to modernize your verification environment or leverage Python’s ecosystem, pyUVM is worth exploring. Next, I plan to experiment with more complex verification environments and see how pyUVM scales with larger designs.
Let me know your thoughts or experiences with pyUVM in the comments!